General Ledger — Controller Guide (Chart of Accounts · Journal Entries · Books)
The general ledger is your accounting system of record. The chart of accounts is the list of buckets money can go into; a journal entry is a balanced movement between those buckets; and the books are the posted history you read. This guide walks all three — how the chart is structured (including the GovCon allowability tag), the exact clicks to create, post, and reverse a manual entry, and how corrections stay auditable. It assumes you run a business but aren't necessarily a career government accountant.
For: controllers and bookkeepers · Time: ~15 minutes · You'll need: the Accounting module (and, to post directly, a controller / admin / CFO role).
Everything here sits under the Accounting → General Ledger nav section:
Journal Entries (/accounting/journal-entries), Chart of Accounts
(/accounting/admin/chart-of-accounts), and Books
(/accounting/books — P&L, Balance Sheet, Cash Flow, Trial Balance, GL). The
new/edit entry form opens at /accounting/journal-entries/new and
/accounting/journal-entries/:id.
Part 1 — The ideas you need first (read once)
The chart of accounts (your buckets)
Every account carries:
- a number and name (e.g.
6100 — Office Supplies), - an account type — one of asset, liability, equity, revenue, expense, gain, or loss — which decides where it lands on your financial statements, and
- for government contractors, an allowability flag — allowable (billable to the government under FAR), unallowable (a real expense, but excluded from what you charge), partially allowable, or requires review. Getting this right is the backbone of a defensible indirect rate.
Accounts can also nest under a parent account, which is what gives the chart its tree shape, and each can be tagged with a cash-flow category (operating, investing, financing, or a non-cash adjustment) that drives the Cash Flow statement.
Journal entries (the atom of accounting)
Every financial event is recorded as a journal entry with two or more lines where total debits equal total credits — always. That balance is what keeps the books internally consistent. An entry that doesn't balance isn't a smaller problem; it isn't a valid entry, and Arcvue won't post it.
Most entries are produced for you (from bills, invoices, payroll, the bank feed). The Journal Entries page is for the manual ones — the things that aren't transactions: accruals, reclassifications, corrections, adjustments. On this form an entry also carries a type: Standard, Accrual, Reclassification, or Correcting.
Posting, approval, and reversal
- Posting commits an entry to the books. Arcvue gates it: the period must be open, the entry must balance, every line needs an account and a description, and there must be at least two lines.
- Approval is the second set of eyes. If your role can post directly (controller / admin / CFO) you'll see Post directly; everyone else uses Submit for approval, and an approver then Approves and posts or Returns to submitter with a reason. Every step is written to an approval history.
- Reversal undoes a posted entry by booking its mirror image. You don't edit or delete posted history — you reverse it, leaving both the original and the reversal as an audit trail (the DCAA-correct reverse-and-rebook). Accruals can be set to auto-reverse on a date you choose.
The books (what you read)
The Books page is the posted ledger — P&L, Balance Sheet, Cash Flow, Trial Balance, and the account-level GL. This is where you answer "what's actually in this account and why," and it's the detail behind every line on your financial statements.
What Arcvue deliberately will not do
- It won't post an unbalanced entry, or one into a closed period.
- It won't let you edit or delete a posted entry — the form goes read-only, and corrections go through a reversal so the record survives.
- It won't let you deactivate an account that still has activity in an open period.
Part 2 — How to run it
The three surfaces work in this order in real life: the chart holds the accounts, journal entries move money between them, and the books are where you read the result. We'll cover the chart first (you set it up rarely), then the entry workflow (you do it monthly).
Step 1 — Open the Chart of Accounts
In the left nav go to Accounting → General Ledger → Chart of Accounts
(/accounting/admin/chart-of-accounts). The header reads Chart of accounts,
with a subtitle counting your accounts and how many are inactive.
The left panel is the account tree. Use the Search account # or name… box at the top to jump to an account, and the Show inactive accounts checkbox below it to include deactivated ones (they're hidden by default and tagged inactive). Click the chevron to the left of a parent account to expand its children; click any account row to load its detail on the right.
Step 2 — Add an account
Click + New account in the top-right (visible only if your role holds read-write on the Chart of Accounts in the permission matrix). A New account dialog opens. Fill in:
- Account number (e.g. a code that fits your existing numbering scheme).
- Account type — pick from asset / liability / equity / revenue / expense / gain / loss. This drives statement placement.
- Account name.
- Parent account (optional) — choose an existing account to nest under, or leave it No parent (top-level).
- Allowability — allowable / unallowable / partially_allowable / requires_review. This is the FAR flag that keeps your indirect rate defensible.
- Cash flow category (optional) — operating, investing, financing, or non_cash_adjustment.
Click Create account. A confirmation toast appears and the new account is selected in the tree.
Step 3 — Edit or retire an account
Select an account in the tree. On the detail panel you can change its Account name, Account type, and Allowability, then click Save changes. The Status field shows Active / Inactive (and flags a Control account where applicable) and is not directly editable — use the toggle instead.
To retire an account you no longer use, click Deactivate (top-right of the detail panel). Arcvue asks you to confirm and warns that accounts with activity in an open period cannot be deactivated — this preserves history rather than deleting it. A deactivated account shows Reactivate to bring it back.
Step 4 — Start a manual journal entry
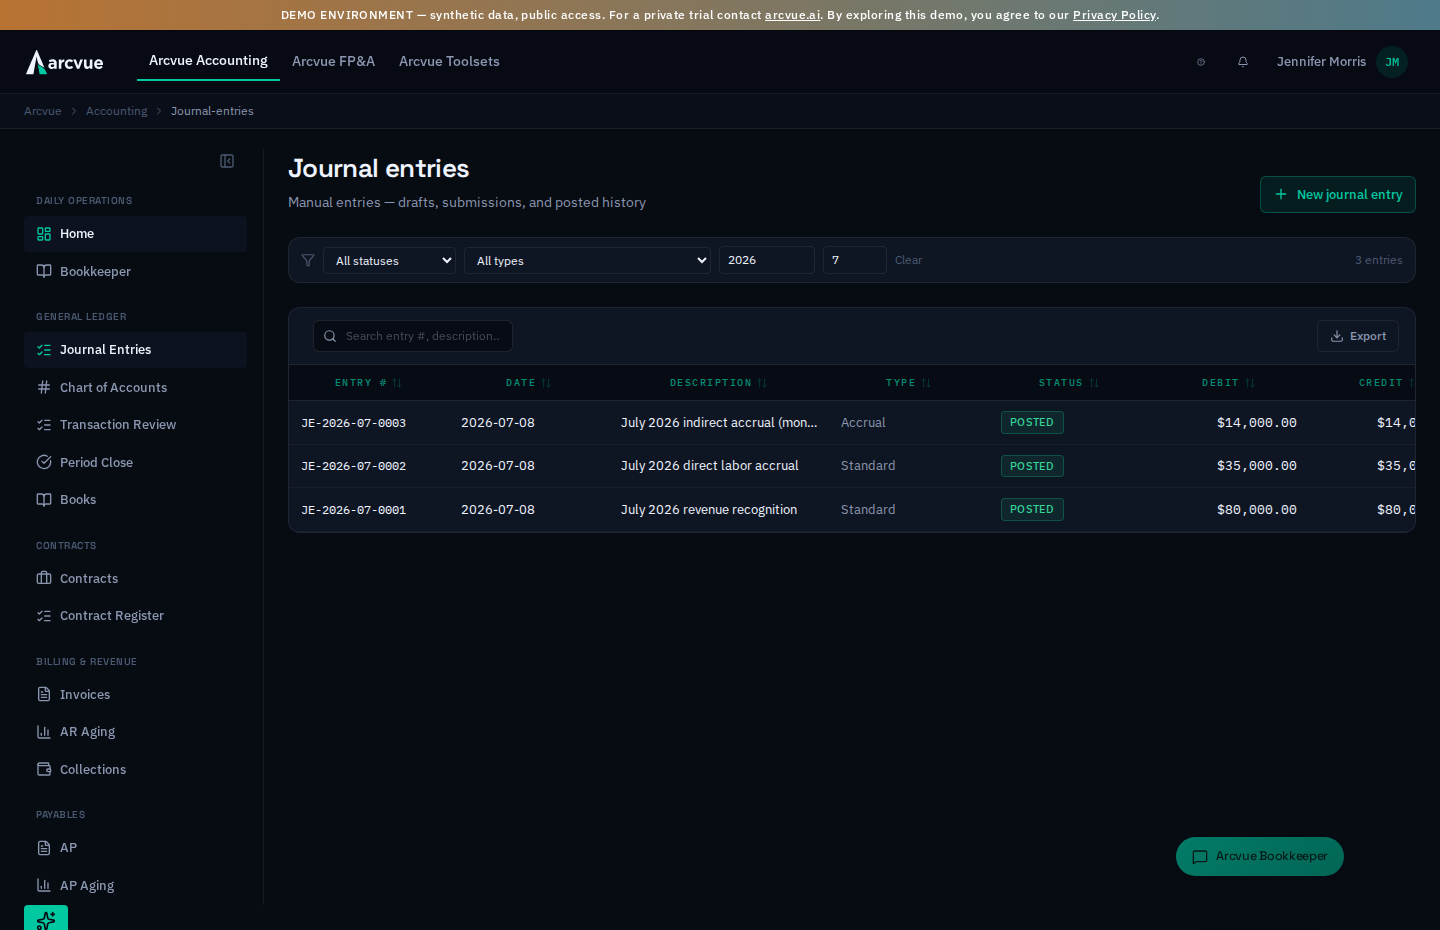
Go to Accounting → General Ledger → Journal Entries
(/accounting/journal-entries). The header reads Journal entries, subtitle
"Manual entries — drafts, submissions, and posted history." The table lists
existing entries with Entry #, Date, Description, Type, Status, Debit, and
Credit; a status chip shows DRAFT, SUBMITTED, or POSTED. Use the
filter strip to narrow by status (All statuses / Draft / Pending Approval /
Posted), type (All types / Standard / Adjusting / Reversing / Opening /
Closing), and Year / Mo; Clear resets all filters. Clicking any row
opens that entry.
To create a new one, click + New journal entry (top-right). You land on the New journal entry form.
Two more controls sit beside it. Recurring opens the recurring entries
(/accounting/journal-entries/recurring), where an entry that repeats every
period is stated once and read back, rather than asked of the Bookkeeper each
time. Check the ledger (/accounting/journal-entries/check) asks for the
ledger check: a read of the whole open period, document by document, beside the
closed months before it. Both are covered in the Journal Entries and Ledger
Check guides.
Step 5 — Fill in the entry
At the top, set the Date (this determines the accounting period) and type a Description.
Then build the lines in the table below. Each row has:
- Account — click the dropdown (labeled Search accounts…) and pick a GL account by number and name.
- Description — a line-level note (required before you can post).
- Debit and Credit — type an amount in one column; entering a value in one automatically clears the other on that line.
Click + Add line to add rows (the form starts with two and won't let you drop below two); the trash icon removes a line. As you type, the Totals row and the balance banner below the table update live: green Balanced when debits equal credits, or amber Out of balance by $X otherwise.
The form is deliberately simple. If you're posting an accrual or need to label the entry, click Show advanced (just under the Description). That reveals Entry type (Standard / Accrual / Reclassification / Correcting), and when you choose Accrual an Auto-reverse date field appears — the daily job reverses the entry on or after that date, so you don't have to remember to back it out. Click Hide advanced to collapse it again.
Step 6 — Save, submit, or post
The action buttons at the bottom light up as the entry becomes valid:
- Save draft (or Update draft when editing) — keeps it as a draft. Needs a description and at least one non-empty line; it does not require balance, so you can park an in-progress entry.
- Submit for approval — routes it to an approver. Requires a balanced entry, at least two complete lines (each with an account, an amount on exactly one side, and a line description).
- Post directly — visible only if your role can post (controller / admin / CFO). Same validation as Submit; this commits the entry to the books immediately.
A toast confirms the result (e.g. "Draft saved as …" with the new entry number, or "Posted"). If the period is closed or the entry is rejected server-side, the toast reports the reason.
Step 7 — Approve or return a submitted entry
When an entry sits at SUBMITTED, an approver opens it and sees two buttons: Approve and post (commits it) and Return to submitter (prompts for a required reason and sends it back to Draft). Every submit, approve, and return is recorded in the Approval history panel at the bottom of the entry, with who acted, when, and any comment.
If your tenant has two-person approval switched on (a tenant configuration your administrator sets), a draft cannot be posted directly — it must be submitted first — and the person who submitted an entry cannot be the one who posts it. Each refusal names which of the two applies.
Supporting documents. On the entry, under Supporting documents, use Attach document to file the invoice, contract or calculation it rests on (PDF, image, CSV or Excel, up to 10 MB each, as many as the entry needs). You can attach after posting; Detach removes the link, not the file. The full mechanics are in Journal Entries, Step 6.
Step 8 — Reverse a posted entry
Open the posted entry. It shows a green Posted — read only badge and the whole form is locked (this mirrors the storage-layer immutability so you never hit a surprise error). If your role can post, you'll see a Reverse entry button.
Click it; a Reverse journal entry dialog opens. Set the Reversal date (target open period) — Arcvue books a companion entry with debits and credits flipped in that period and leaves the original posted. Click Reverse entry to confirm. A toast reports the new reversing entry number, and you're taken to it.
Where the entry detail page asks for a Reason for this entry, write what makes the entry correct — the reason is recorded with the entry, and the reason is what an auditor reads.
Step 9 — Read the result in the Books
To confirm an entry landed where you expect, or to trace a statement figure back
to its entries, go to Accounting → General Ledger → Books
(/accounting/books). Open the GL view and the account you posted to for the
relevant period to see every entry that hit it. This is the same posted history
that feeds the P&L, Balance Sheet, Cash Flow, and Trial Balance.
Part 3 — When something looks wrong
| Symptom | What it means | Fix |
|---|---|---|
| Submit / Post is grayed out | The entry isn't valid yet: it's out of balance, has fewer than two complete lines, or a line is missing an account, an amount, or a line description. | Watch the balance banner — it must read green Balanced — and make sure every line has an account, a Debit or Credit, and a description. |
| "Out of balance by $X" | Total debits ≠ total credits. | Adjust the line amounts until the Totals row matches and the banner turns green. |
| Save works but Post won't | Save draft only needs a description and one line; Post additionally requires balance and two complete lines. | Complete the lines and balance the entry, then Post. |
| The entry form is fully read-only | The entry is Posted — it shows Posted — read only. Posted history is never edited in place. | Use Reverse entry and post a corrected entry. Both stay visible as the audit trail. |
| Post fails with a period error | You're posting into a closed month. | Post to an open period, or reopen the month on Period Close if the correction truly belongs there. |
| I don't see Post directly / Reverse | Those actions require a posting role (controller / admin / CFO). | Use Submit for approval instead; an approver posts it. |
| An account isn't in the line dropdown | It's probably inactive, or the wrong context. | Check it in the Chart of Accounts (toggle Show inactive accounts); reactivate or pick the correct account. |
| Can't deactivate an account | It has activity in an open period. | Close the period, or leave it active — deactivation is blocked to protect history. |
| An accrual reappears next month | It's an auto-reversing entry working as designed — it books this month and reverses on the date you set so it doesn't double-count. | If you didn't want that, post it as Standard instead of Accrual. |
| "Return to submitter" needs a reason | Returning a submitted entry requires a comment for the audit trail. | Type the reason when prompted; it appears in Approval history. |
One-line summary
The GL is your system of record: a typed, allowability-tagged chart of
accounts on /accounting/admin/chart-of-accounts; balanced journal entries
you create on /accounting/journal-entries, save as drafts, then submit or post
directly, correcting posted history only by Reverse entry (never an in-place
edit); and the Books on /accounting/books where you trace any balance back
to the entries behind it.
Related
- Freeze the month and run the final allocation → Close a Month (Period Close)
- Watch pool ÷ base and file Schedule A → Indirect Rates — Controller Guide
- Work the AI-coded coding queue → Transaction Review (
/accounting/review)