Procurement / Purchase Orders — Controller Guide
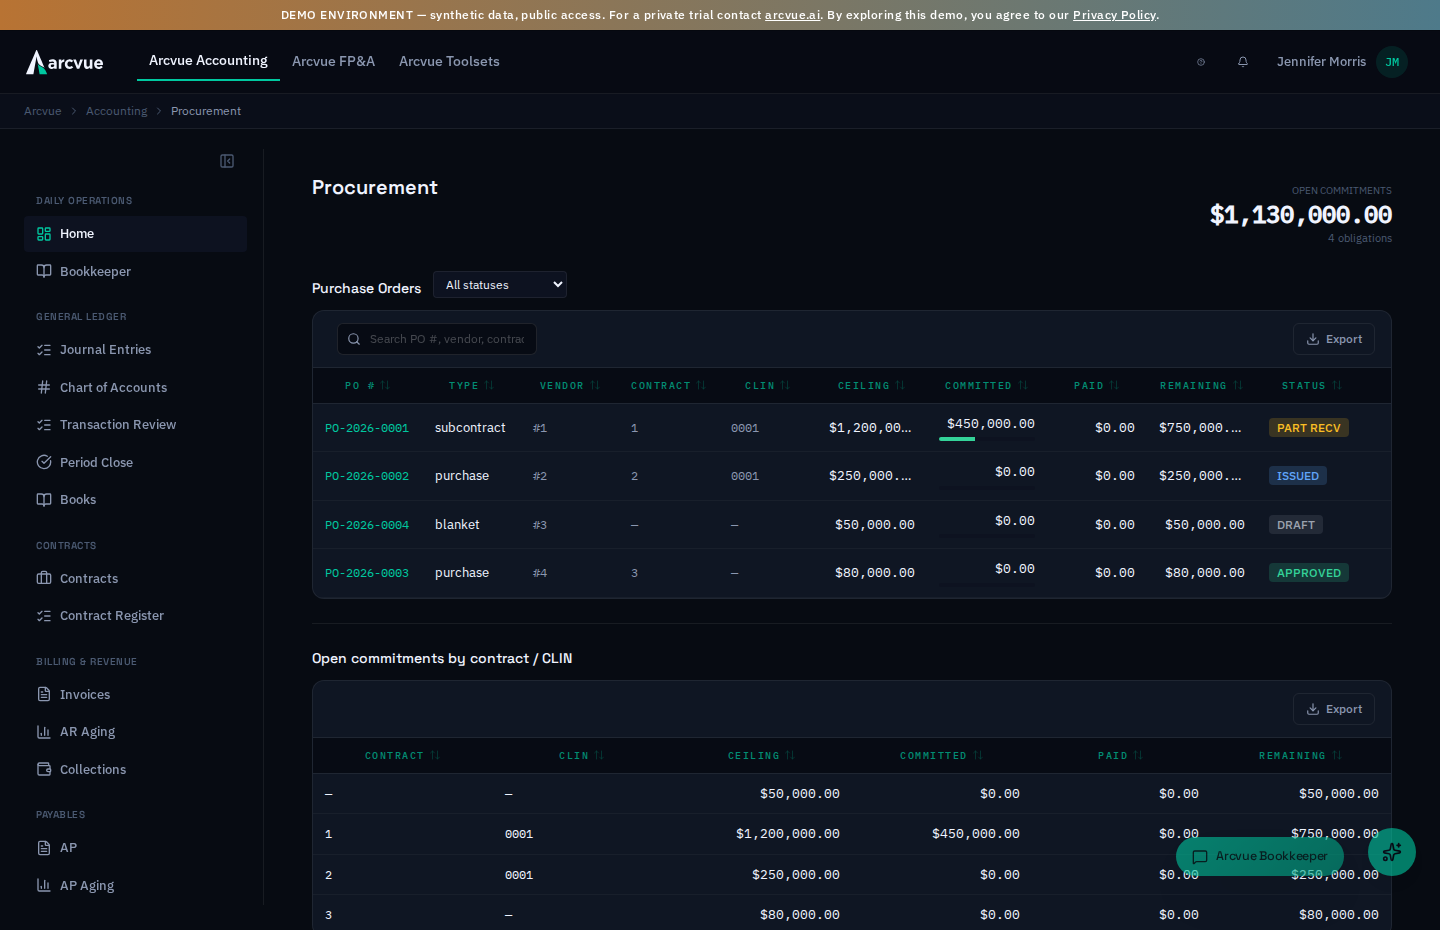
A purchase order is a commitment to buy before the money goes out: you bless the spend up front, record what actually arrives when it arrives, and match the vendor's bill to both before you pay. That up-front approval is the control, and it's also your documented, defensible purchasing trail for an auditor. This guide explains the PO lifecycle, then walks the exact clicks in Arcvue to advance a PO, receive against it, and watch what you've committed but not yet spent. It assumes you run a business but aren't necessarily a career government accountant.
For: controllers · Time: ~10 minutes · You'll need: the Accounting module.
Purchase orders live under Accounting → Payables → Procurement
(/accounting/procurement). Clicking any PO number opens its detail page at
/accounting/procurement/:id, where the receipt and three-way-match work happens.
Part 1 — The ideas you need first (read once)
What a purchase order is (and why it exists)
A PO records that you've agreed to buy a specific thing, at a specific price, before you're invoiced. Approving the spend up front — when it's committed, not scrambled to justify after a bill shows up — is the control. For a government contractor it's also the paper trail that proves your purchasing was authorized and priced deliberately.
The lifecycle (these are the exact statuses you'll see)
Arcvue tracks a PO through eight statuses, shown as a colored badge on both the list and the detail page:
- Draft — entered but not yet authorized. Not a real commitment.
- Pending Approval — submitted and waiting on the approver. The PO leaves Draft when you send it for authorization; it is not a commitment yet.
- Approved — the spend is authorized. The commitment is live.
- Issued — the PO has been sent to the vendor; it can now be received against.
- Partially Received (
PART RECV) — some of the goods/services have arrived and been accepted; more is still outstanding. - Fully Received (
FULL RECV) — everything ordered has been accepted. The normal end state. - Closed — administratively finished.
- Canceled — killed before completion, with a recorded reason.
Ceiling, committed, paid, remaining (the four numbers on every row)
Every PO carries four dollar figures, and the whole page is built around them:
- Ceiling — the most this PO authorizes you to spend.
- Committed — how much of that ceiling is actually spoken for.
- Paid — how much Accounts Payable has already paid against it.
- Remaining — ceiling minus committed: your headroom. A negative Remaining shows in red — you've committed past the ceiling, which needs attention.
Open commitments (money spoken for but not spent)
Between "approved" and "invoiced," a PO's remaining amount is an open commitment — cash you've promised but haven't paid out. This matters because your available cash is your bank balance minus what you've already committed, not the bank balance alone. An approved PO with nothing received yet is a full open commitment; it draws down as you receive and AP pays against it. Arcvue totals your open commitments at the top of the page and breaks them out by contract and CLIN at the bottom.
The three-way match (why the PO is half of it)
When the vendor's invoice arrives, Accounts Payable checks that three documents agree: the PO (what you ordered), the receipt (what came), and the invoice (what you're billed). The PO you work here is the anchor of that check — no PO, no match, and the bill has to be trusted on its own. The detail page shows a live Three-way match panel comparing PO ceiling, committed, receipts accepted, and AP paid, and tells you plainly whether they reconcile.
What Arcvue deliberately will not do
- It won't treat an unapproved (draft) PO as a real commitment.
- It won't quietly let AP paid or receipts run past the PO — the match panel flags "AP paid exceeds receipts accepted" and "Receipts exceed PO ceiling" in red rather than passing them through.
This screen is where you advance and receive purchase orders — it does not have a "create new PO" form. A purchase order is created through Arcvue's Procurement API and arrives here as a Draft; there is no upstream feed that writes them and no form on this page yet, so if you expect to author a PO from scratch here, that surface doesn't exist today.
Part 2 — How to run it
Step 1 — Open the Procurement list
In the left nav, go to Accounting → Payables → Procurement (/accounting/procurement).
The page header reads Procurement. In the top-right corner you'll see Open
commitments with a large dollar total and, beneath it, a count like "3 obligations" —
that's the sum of everything you've committed but not yet cleared.
Step 1b — Subcontract agreements and the executed copy
The control is Create agreement, which reads Creating... while it saves.
Below the purchase orders sits Subcontract agreements — the instruments a subcontract commitment is placed under. Create one with + New subcontract agreement beside the page heading; the form's own help walks every field. Each row shows Agreement #, Subcontractor, Pricing type, Period, Ceiling, Funded, Committed — with a bar for how much of the ceiling the live commitments have used — and Executed copy.
Why the ceiling matters. Every commitment placed under an agreement is measured against that ceiling: Arcvue adds up the ceilings of the live commitments and refuses the one that would take the total past it. That is the limitation-of-funds control (FAR 52.232-20 and 52.232-22), enforced in the database rather than on a screen.
When you create a subcontract commitment with + New purchase order, choose its agreement under Subcontract agreement in the Instrument block. The list shows the headroom left under each agreement, the form warns when the ceiling you type exceeds it, and the commitment that would exceed it is refused. Left as none, a commitment is outside the check and the form says so.
Verify the executed copy. Once the subcontract is countersigned, click verify on its row. The Verify executed copy dialog opens, headed with the subcontractor and agreement number. Choose the signed PDF under Executed copy (PDF) — up to 25 MB — and click Upload and compare. Arcvue reads the agreement terms off the document and compares each one with the record. Nothing on the record changes. The record is what you authored; the document is the thing being checked, so a difference is a finding about the paper, not a correction applied for you.
The result is a table with four columns — Term, On record, In document and Status — one row per term (subcontractor, agreement number, pricing type, period start, period end, ceiling, funded). Each row reads one of:
- Matches — the document says what the record says.
- Differs — both say something and they disagree. Money is compared to the cent: a one-dollar difference on a ceiling is an edit, not rounding, because the ceiling is the figure the limitation-of-funds check enforces against. Decide before invoices post — correct the record if it was typed wrong, or have the agreement re-executed if the paper was changed — then verify again.
- Only in document — the paper states a term the record leaves blank. Fill it in on the record.
- Not found in document — the reader could not locate the term. That is a statement about the reading, not proof the paper is silent; the reader is told never to guess. Check that page by hand.
- Neither — neither side states the term.
The banner above the table summarizes the outcome, with who verified it and when. Every check is kept as evidence. Back on the list, Executed copy shows the latest: Not verified, Verified with the date, or the number of differences. Verify another copy checks a corrected or re-executed document (the earlier check stays on file); Back to last result returns to it without uploading; Done closes the dialog.
Clause flow-down — three answers, and the blank one is real
The agreement form carries a Clause flow-down block: the prime-contract clauses that may have to be passed down to this subcontractor. Four are asked about by name — Service Contract Labor Standards, Utilization of Small Business Concerns, Subcontracts for Commercial Products and Safeguarding Covered Defense Information.
These are not checkboxes. Each has three answers: Not determined,
Flows down, Does not apply — and Not determined is the default.
That is deliberate, and it is the one thing to understand before you touch the
block. Whether a clause flows down is a determination made by reading the
prime contract, which is usually a different task on a different day from
recording the agreement. Not determined says exactly that, and it is an
honest record rather than an unfinished one.
So do not click through these to clear the block. Choosing Does not apply is not the same as leaving it alone — it writes a determination, and once written nothing distinguishes it from one a person actually made after reading the contract. That is why this form keeps the blank rather than defaulting to a no: a recorded "no" that nobody decided reads exactly like a determination, and no later reader can tell the two apart.
Set each clause when you have read the prime contract and know the answer. Leave the rest at Not determined and come back — an unanswered clause is visible work, and a wrongly answered one is invisible.
Step 1c — Load an agreement that was in force before Arcvue
Every subcontract already in force when you started using this module exists only on paper. Load those with Load agreement from PDF beside the page heading: choose the signed subcontract (PDF, up to 25 MB) and click Upload and queue for review. Arcvue reads the agreement terms off the document and queues them under Contract Documents as an Issued subcontract with a Subcontract Agreement action badge.
Nothing is created by the upload. Open the document in Contract Documents, check the extracted terms — correct any the reader misread, as you would for an award — choose the Subcontractor from your register, optionally enter the Prime contract id, and click Accept. The document names a company; you name the register entry, and Arcvue never matches the two for you, because a near miss would bind the agreement to the wrong payee and every invoice after it. Accepting writes the agreement exactly as + New subcontract agreement would have; it appears under Subcontract agreements with its clause flags still Not determined, because the reader never fills those in.
This is for backfill only. A new subcontract is typed in — the contracts manager who drafted it already knows every term, and the typed record is what the executed copy is later verified against (Step 1b).
The upload dialog, and doing several in a row
Load agreement from PDF opens a small dialog. Executed subcontract (PDF) is the file picker; it takes one signed subcontract, PDF only, up to 25 MB. The server is the authority on that limit and refuses a larger file, so a document just over the line fails on upload rather than silently truncating.
When the read finishes, the dialog tells you how many terms Arcvue found and flags anything it wants a person to look at. It does not show you the terms — that is the review step, in Contract Documents.
You will usually have more than one of these. Load another clears the dialog for the next signed agreement without closing it, so a stack of legacy subcontracts goes in one after another. Done closes the dialog, and Cancel backs out before anything is uploaded.
Step 1b or Step 1c? The same document means opposite things
These two steps take the identical document — the signed subcontract, PDF, same size limit — and they are not interchangeable.
- Step 1b, verifying the executed copy, tests the paper against a record that already exists: you typed the agreement, and this checks the signed copy matches it.
- Step 1c, backfill, proposes a record that does not exist yet, because the agreement predates the module and nobody ever typed it.
So the question is not which document you have — it is whether the agreement is already in Arcvue. If it is, verify. If it is not, backfill. Verifying against a record that does not exist has nothing to compare, and backfilling one that does creates a second copy of an agreement you already hold.
Step 1d — Record a modification to an agreement
A subcontract gets modified far more often than it gets signed. Most modifications are about money: the customer funds another increment, or the government deobligates what it did not need, and the subcontract's ceiling moves with it. Until you record that here, Arcvue still holds the figure from the original paper — and because the ceiling is a control and not a note, the effect is not cosmetic. Arcvue refuses a purchase order that would take your total commitments past the stored ceiling. So an increase you have not recorded does not show up as a stale number; it shows up as Arcvue refusing spend you have actually authorized, and the person who discovers it is whoever tries to raise the next commitment.
Have the executed modification in front of you before you start. Everything on this screen is a document fact, and the screen is deliberately shaped like the paper: a modification states a FROM and a TO, so each field shows what Arcvue currently holds directly above where you type the new value.
- On the Procurement list, find the agreement row and click modify.
- Work down the four fields. Each shows Currently and its stored value, so
you can see at a glance whether you are recording a change or retyping what
is already there.
- Ceiling — the revised total the subcontract may reach, as the modification states it. Enter the revised figure, not the increase it adds.
- Funded — how much of that ceiling is obligated now. Leave it blank if the paper states a ceiling and no separate funding figure; blank means not stated, which is a different fact from zero.
- Period end — the last day of performance after this modification.
- Status — Active while the subcontract can still be committed against; Expired once its period of performance has run out; Closed when the work finished or the subcontract was terminated. Moving off Active stops new commitments and touches nothing already posted. Anything the modification did not touch, leave exactly as you found it.
- The footer tells you how many fields will be recorded. While it reads Nothing changed yet, Record modification stays disabled — so you cannot save a no-op and later mistake it for a recorded amendment.
- Click Record modification. Cancel leaves the agreement untouched.
Only the fields you changed are written. That is why the screen shows you the current value rather than pre-filling a blank form: clearing a figure and never touching it are different instructions, and Arcvue treats them differently. An emptied field is recorded as not stated; a field you leave alone is not touched at all.
What a modification cannot change
Five things are fixed once an agreement exists, and the screen does not offer them: the subcontractor, the prime contract, the subcontract number, the type (T&M, FFP, and so on) and the period start. A document that changes one of those is not a modification to this agreement — it is a different agreement, or a sign that this row was keyed wrong in the first place. If you believe one of those is wrong, do not work around it here; the row needs correcting or replacing, and anything already committed or invoiced against it has to be looked at first.
Two refusals you may see, both of them doing their job:
- Funded cannot exceed the ceiling. Arcvue checks the whole row, not just what you typed — so a funding figure is judged against the ceiling already stored even when the modification says nothing about the ceiling. If the modification really does raise both, enter both.
- Period end must be on or after period start. The start never moves, so a modification that appears to end the work before it began is a misread of the document or a mis-keyed row.
Recording a modification does not touch the labor rates underneath the agreement (Step 1b). If the modification changes what you pay per hour, retire the old rate and enter the new one from its own effective date; if it only changes hours or money, the rates stand.
Step 2 — Find the PO you need
Under the Purchase Orders heading is a status dropdown that defaults to All statuses. Use it to narrow the list — the options are Draft, Pending Approval, Approved, Issued, Partially Received, Fully Received, Closed, and Canceled. To find work that needs your attention, filter to Draft (needs submitting), Pending Approval (needs approving) or Approved (needs issuing).
The table shows one row per PO with these columns: PO #, Type, Vendor, Contract, CLIN, Ceiling, Committed, Paid, Remaining, and Status. The Committed cell has a small usage bar underneath it that turns green under 70%, amber at 70–89%, and red at 90%+ of the ceiling — a glance-level read on how much headroom each PO has left. A red Remaining figure means that PO has committed past its ceiling.
Step 2b — Raise a new commitment, and why the form changes shape
Two dropdowns on this form say why they are empty rather than simply being empty, and both mean the same thing: the list has nothing to offer yet, not that the form failed to load.
- No vendors on file — no vendor exists to raise the commitment against.
- No accounts on file — no account exists to charge it to.
Either one is a prerequisite you satisfy elsewhere before this form can be completed.
The Type field is not a category you pick afterwards. It decides what
the form asks you for. The four values are Subcontract, Purchase,
Blanket and IDIQ call. Choosing Subcontract reveals the fields that
make a commitment an instrument rather than a purchase — prime contract, CLIN,
period of performance, DPAS rating and consent — and a buyer ordering supplies
never sees them. So if you are looking for the CLIN field and cannot find it,
the Type is still Purchase. Set Type first, then fill the form.
The number field follows Type too: it reads PO number on a purchase and Subcontract number on a subcontract. (Assistive technology announces that field as Commitment number, which is the underlying name for both.)
Legal entity and Vendor are read from your own tenant, not from a list Arcvue ships. While the entity list is still arriving the field shows Loading... — that means wait, not that you have no entities to choose.
DPAS rating appears on a subcontract and offers none, DO-A1, DO-A2,
DO-A3, DO-B and DX. none is the ordinary case and is what you leave
it at unless the prime contract passes a priority rating down to you; a rating
you invent here is a representation to the vendor about a defense priority the
contract may not carry.
+ Add line appends a row, and the Lines: count beside it is the quick check that you added the one you meant to.
Each line you add asks for Description, Qty, Unit, Unit price, Account, Cost type, From and Until, and shows Extended — which Arcvue computes as quantity times unit price rather than asking you for it, so a line whose Extended does not match your own arithmetic means one of the two inputs is wrong, not the total.
Cost type offers Not stated, Direct and Indirect. Not stated is a real answer and it is the default, not a blank waiting to be filled: use it when the commitment is not yet attributable, and set Direct or Indirect once you know, because that is what decides whether the cost reaches a contract or a pool.
Step 3 — Submit a draft PO, then approve it
A draft becomes a commitment in two moves by two people, and the far-right column of the row offers exactly the move the PO can take next:
- If a PO is in Draft, its row shows a submit link. Click it to send the PO for authorization. A "Submitted for approval" toast confirms it and the badge flips to PENDING APPROVAL. On the detail page the equivalent is the Submit for approval button in the action bar at the bottom.
- Once it is Pending Approval, the row shows an approve link. Click it to authorize the spend. An "Approved" toast confirms it and the badge flips to APPROVED. On the detail page the equivalent is the green Approve button.
A draft cannot jump straight to Approved — the submit step is the approval-before-issue gate, and the engine refuses to skip it. If a link cannot complete, the toast shows the reason the server returned.
The action links act for roles with write access to Procurement. A read-only role sees the list and the detail and is refused on any action, which is the permission matrix working rather than a fault.
Step 4 — Issue the PO to the vendor
Once a PO is Approved, its row shows an issue link in the same far-right column. Click it to mark the PO issued (sent to the vendor). An "Issued" toast confirms it and the badge flips to ISSUED. On the detail page the equivalent is the blue Issue PO button.
Issuing is the gate that unlocks receiving — you can only record receipts once a PO is Issued (or already Partially Received).
Step 4b — Record the contracting officer's consent
A PO that requires consent cannot be issued until the consent is RECORDED. Issuing refuses it outright and cites FAR 44.201, so the amber "(pending)" beside Consent required is not advisory — it is the thing stopping the PO from going out.
The control sits right there, beside the badge. On the detail page,
Record consent opens a small form; filling it in and pressing
Record consent again submits it. The same words label both the link that
opens the form and the button that commits it, so the second press is the one
that counts.
Consent date is the date the contracting officer signed — not today. It is required, and it is deliberately not prefilled: a supplied default
is indistinguishable from a decision, and a consent dated the day you typed it
is a different fact from the one on the document. Leave it blank and the form
refuses.
Two more refusals, both deliberate:
- A PO that does not require consent is refused, rather than quietly accepting one. Consent recorded where none was needed is not harmless — it makes the consent required flag unreadable afterwards, so nobody can tell later which POs genuinely needed it.
- Consent already recorded is refused, and the refusal names the existing date and who recorded it.
There is no way to correct a consent date once it is recorded. Re-recording is refused, not overwritten, and an amend path does not exist yet. Read the date off the document before you press the button — this is the one field on this screen you cannot walk back.
Step 5 — Open a PO to review it
Click any PO # (the teal link in the first column) to open its detail page. At the top you'll see the PO number, its Type · Vendor · Contract · CLIN, and — if the PO carries a defense priority rating — an amber DPAS badge. The top-right shows the Ceiling and the status badge.
Just below, a meta panel lays out Period start / Period end, Funded, Issued date, Consent required (with "(pending)" in amber if consent is required but not yet obtained), Legal entity, Created by, and Approved date. Under that, the Three-way match panel shows PO ceiling, Committed, Receipts accepted, and AP paid side by side, with a verdict line beneath (see Step 7). The Line items table lists what was ordered (description, qty, unit price, ceiling, received qty/$, GL account, cost type, status), and the Receipts table lists everything received against the PO so far.
The four dollar columns belong to two different tables, and the difference is ordered-versus-arrived.
- Line items — what was ordered.
Unit $is the price per unit andReceived $is the value received against that line so far, beside Received qty. - Receipts — what actually arrived.
Accepted $is the value accepted on that receipt andAccepted byis who accepted it.
So Received $ and Accepted $ are not two names for one number: the first
is a running total on the order line, the second is a single event on a receipt.
Accepted by is the only column on either table that records a person, which
is what makes a receipt evidence rather than a number.
Step 6 — Record a receipt when goods or services arrive
When something arrives and you accept it, record the receipt — this is the middle leg of the three-way match and it's what tells the system the thing actually showed up.
On the detail page, when the PO is Issued or Partially Received, a Record receipt form appears in the action bar. Fill in, left to right:
- Date — the date field (the receipt/acceptance date).
- Receipt type — a text field prefilled with
goods; change it toservices(or another type) as appropriate. - Amount — the field labeled "amount in cents". This is entered in cents,
not dollars — enter
150000for $1,500.00. (Yes, this is a literal quirk of the current form; watch the decimal.) - AP invoice id (opt) — optionally link the AP invoice this receipt corresponds to, by its id.
- Acceptance notes — a free-text note (what you inspected/accepted).
Then click the teal Record Receipt button. Date, receipt type, and amount are all required — leave any blank and you'll get a "Date, type, and amount required" toast. On success a "Receipt recorded" toast fires, the form clears, and the receipt appears in the Receipts table. As you receive, the PO's status advances to Partially Received and then Fully Received, and its open commitment draws down.
Step 7 — Read the three-way match verdict
After receipts and AP payments post, the Three-way match panel resolves to one of these lines:
- Green "✓ Reconciled: ceiling = receipts = paid." — all three legs agree; the PO is settled.
- Neutral "PO active. Match completes when receipts and paid reconcile to ceiling." — still in flight, nothing wrong.
- Red "⚠ AP paid exceeds receipts accepted — investigate." — you've paid for more than you've accepted; something is out of order.
- Red "⚠ Receipts exceed PO ceiling." — you've accepted more than the PO authorized.
The red lines are the control working; work them from Part 3.
Step 8 — Watch open commitments
Back on the list page, scroll to Open commitments by contract / CLIN at the bottom. This table rolls up every open PO by Contract and CLIN, showing Ceiling, Committed, Paid, and Remaining per line. Use it to understand how much of your available cash is already spoken for, and to spot commitments that have been sitting open too long. As with the PO rows, a negative Remaining shows in red.
Step 8b — Close a fully received PO
When everything ordered has been accepted the PO reads Fully Received, and its row shows a close link (the detail page shows Close PO). Click it once the last invoice against the PO is in. A "Closed" toast confirms it and the badge flips to CLOSED. Closing is what releases the PO's remaining amount from open commitments — a fully received PO left un-closed keeps holding its commitment against the contract or CLIN forever, and overstates the figure a controller reads by every completed PO.
Step 9 — Cancel a PO if the purchase won't happen
If a PO should be killed, open it and use the cancel row at the bottom of the action bar (available for any PO that isn't already Canceled, Closed, or Fully Received). Type a reason in the "Cancel reason" field — a reason is required, the Cancel PO button stays disabled until you enter one — then click the red Cancel PO button. A "Canceled" toast confirms it and the badge flips to CANCELED. The reason is your audit record for why the commitment was withdrawn.
Part 3 — When something looks wrong
| Symptom | What it means / what to do |
|---|---|
The submit / approve / issue / close link isn't on the row | Each inline action shows only for the status that can take it — Draft (submit), Pending Approval (approve), Approved (issue), Fully Received (close). For any other status the action column is empty — the PO is already past that step, or in a terminal state (Closed / Canceled). |
| The Record receipt form isn't showing | It only appears when the PO is Issued or Partially Received. If the PO is still Draft, Pending Approval or Approved, submit, approve and then issue it first (Steps 3–4). |
| "Date, type, and amount required" toast | One of the three required receipt fields is blank. Fill Date, Receipt type, and Amount (in cents), then click Record Receipt again. |
| A receipt amount posted 100× too big or too small | The amount field is in cents. $1,500.00 is 150000, not 1500. If a receipt is wrong, record a correcting entry / re-check the figure against the vendor's document. |
| Three-way match shows "AP paid exceeds receipts accepted" | AP has paid for more than you've accepted. Record the missing receipt if goods did arrive, or investigate the AP payment if they didn't — don't leave this red. |
| Three-way match shows "Receipts exceed PO ceiling" | You've accepted more than the PO authorized. Confirm against the PO; if a legitimate change happened, the PO ceiling should be raised at its source (an approved change order), not worked around here. |
| Remaining is red (negative) | Committed has run past the ceiling on that PO or commitment line. Same fix: verify the commitment, and correct the ceiling upstream if there was an authorized increase. |
| An open commitment won't clear | Commitments draw down as you receive and AP pays. A lingering commitment means the PO was approved/issued but never fully received or paid — either it's genuinely still outstanding, or it should be canceled/closed because the purchase won't complete. |
| "Consent required" shows amber "(pending)" | This PO needs consent-to-subcontract (or similar) that hasn't been recorded yet. Obtain and record the consent before treating the commitment as fully cleared. |
| A PO seems stuck in a status | Note the exact status it's in and report it with the PO number — PO status transitions are a known area under hardening, and a specific stuck example is the fastest way to get it fixed. |
| "An invoice won't match its PO" (in AP) | The match needs all three legs. Confirm the PO number on the bill matches a real PO, the PO is Approved/Issued (not still Draft), and a receipt has been recorded — a missing receipt is the most common cause of a match that won't complete. |
One-line summary
A purchase order commits spend up front: on Accounting → Payables → Procurement, approve a draft, issue it to the vendor, open it to record receipts (amount in cents) as goods arrive, and read the three-way match panel to confirm ceiling, receipts, and AP paid reconcile — while open commitments at the top and by contract/CLIN at the bottom keep your available-cash picture real.
Related
- Match and pay the vendor bill → Accounts Payable (
/accounting/ap) - What a GovCon close covers → Close a Month (Period Close)
- How committed spend hits your rates and cash → Indirect Rates